Whether you’re setting up a GMRS mobile rig for trail runs or a new Ham base station, your radio is only as good as its antenna. If your antenna isn’t perfectly matched to your operating frequency, you create a silent bottleneck. Instead of radiating out into the sky, a massive portion of your transmission power bounces right back down the wire and floods into your radio.
We measure this electrical efficiency using SWR, or Standing Wave Ratio. You can think of SWR as a report card for your antenna setup. A low ratio means your power flows out freely, maximizing your transmission range. A high ratio means your radio is literally choking on its own signal, creating intense heat that can quickly destroy your rig’s sensitive internal components.
Checking your SWR is the single best insurance policy you can give your gear. Fortunately, learning how to decode the numbers and run a physical bench test takes less than five minutes.
The SWR Scorecard
SWR is expressed as a ratio, like 1.5:1. Think of these numbers as a simple traffic light system for your radio’s health.
An ideal reading sits between 1.1:1 and 1.5:1 (Green Light). This is the sweet spot for maximum range and safe operation. It means your antenna is highly efficient and your radio is running cool.
As you climb from 1.5:1 to 2.0:1 (Yellow Light), your system is still completely safe to operate, but you are experiencing minor efficiency losses. Most stock antennas land right here out of the box.
Hitting 2.0:1 to 3.0:1 (Orange Light) is a warning. Your range will drop, your radio will run hot, and you should keep your transmissions brief while you work to tune the antenna.
Anything above 3.0:1 (Red Light) is a hard stop. Do not press the talk button. This level of reflected power will rapidly fry your radio’s internal power amplifier. A reading this high usually means something is physically broken in your coax or connectors.
Gear and Setup
To test your system, you only need your radio, an external SWR meter, and a short coaxial jumper cable. Make sure your SWR meter is rated for the specific frequencies you use, a meter built strictly for HF ham radio won’t read UHF GMRS frequencies accurately.
Connecting the meter incorrectly is the most common beginner mistake, but it is easy to avoid if you follow the labels on the back of the device. First, turn off your radio completely to ensure safety. Unplug your main antenna cable from the back of the transceiver and screw it directly into the port on the SWR meter marked ANT or Antenna.
Next, take your short coaxial jumper cable to bridge the remaining gap. Plug one end into the radio’s antenna output and the other end into the SWR meter port labeled TX, RIG, or Transmitter. Your meter is now safely in-line, sitting directly between your radio and your antenna, ready to intercept and measure the power flow.
Measuring Your SWR
Before you hit the microphone button, turn your radio to a clear, unused channel on low power. It is vital to listen for a few seconds first to ensure you aren’t accidentally transmitting over an ongoing conversation or interfering with a local repeater. Once you have a clear frequency, find the primary toggle switch on your SWR meter and flip it to the position labeled CAL or Forward.
With the meter set to calibrate, press and hold the push-to-talk button on your microphone. While holding the button down, use your other hand to turn the meter’s adjustment knob until the physical needle moves all the way to the right, aligning perfectly with the “Set” mark at the end of the scale. As soon as the needle hits the line, release the microphone button.
To get your final reading, flip that same toggle switch over to the SWR or Reflected position. Key your microphone one more time and look at the needle’s new position on the scale. The number the needle points to is your current SWR score, which you can now stack against the scorecard to see if your system is healthy or needs tuning.
How to Fix High SWR
If your needle spikes straight into the red danger zone, do not panic. A sky-high reading usually points to a straightforward physical connectivity issue rather than a permanently broken antenna.
First, examine your coaxial cables and connectors carefully. Look for severe pinches where a cable might have been slammed in a vehicle door, or loose, poorly soldered PL-259 connectors at either end of your line. A hidden break inside the wire shield or a loose connection will reflect almost all your power straight back to the meter.
Next, evaluate your antenna’s physical environment. If you are testing a mobile magnetic-mount antenna, it absolutely requires a flat, metallic surface, like a car roof or hood, to act as a ground plane. Testing a mobile antenna while it sits on a plastic folding table or a wooden workbench will result in a massive, immediate SWR spike.
Finally, double-check your frequencies. Using a dedicated Ham 2-meter antenna to transmit on GMRS channels will cause an automatic mismatch because the physical length of the antenna element is cut for a completely different wavelength. Matching your equipment to your exact operating band is the easiest way to keep your SWR low and your radio safe.
Purchase Guide
Surecom SW-102
Digital VHF/UHF Power & SWR Meter

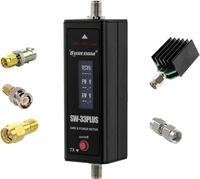
Purchase Guide
Surecom SW-33 Plus
100W VHF/UHF Handheld Power & SWR Meter